Airflow UI: How to trigger a DAG with custom parameters?
Airflow is one of the most widely used Schedulers currently in the tech industry. Initially developed at Airbnb, a few years ago it became an Apache foundation project, quickly becoming one of the foundation top projects.
It is a direct competitor of other schedulers such as Spotify's Luigi or newer solutions such as DigDag or Prefect (created by core Airflow developers, I'm keeping this one on my list for future projects when it matures a bit).
At my current company, Daltix, we are moving away from an older tool, Jenkins, a CI/CD tool we hacked so it can act as a job scheduler, to Airflow. The improvements we gained by using an actual job scheduler are great (dag visualization, dynamic dag setup, specific task triggering among others),
BUT
There is a feature that Jenkins has that most schedulers do not. I will explain with an example.
Lets say I have a DAG (we can call it a job) that performs some sql queries to generate a Persistent Derived Table PDT for a customer.
This job will be a templated job, meaning that in order to run it we need to specify which customer database (as a parameter customer_code for example) to run it for. We can do so easily by passing configuration parameters when we trigger the airflow DAG.
Here is what the Airflow DAG (named navigator_pdt_supplier in this example) would look like:

So basically we have a first step where we parse the configuration parameters, then we run the actual PDT, and if something goes wrong, we get a Slack notification.
The first step, parse_job_args_task is a simple PythonOperator that parses the configuration parameter customer_code provided in the DAG run configuration (a DAG run is a specific trigger of the DAG):
dag = DAG(
    dag_id="navigator_pdt_supplier",
    tags=["data_augmentation"],
    schedule_interval=NONE,
)

dag.trigger_arguments = {"customer_code": "string"} # these are the arguments we would like to trigger manually

def parse_job_args_fn(**kwargs):
    dag_run_conf = kwargs["dag_run"].conf #  here we get the parameters we specify when triggering
    kwargs["ti"].xcom_push(key="customer_code", value=dag_run_conf["customer_code"]) # push it as an airflow xcom

parse_job_args_task = PythonOperator(
    task_id="parse_job_args_task",
    python_callable=parse_job_args_fn,
    provide_context=True,
    dag=dag
)
After this step, we can reference the customer_code parameter in the PDT just by doing (this is an example):
run_pdt = SQLOperator(
  query=f"USE DATABASE {{ task_instance.xcom_pull(key='customer_code') }}"
Great! Only question though, how do we actually run this DAG? We can't run it on a cron basis, since we need to provide additional parameters to the DAG when we trigger it. We can't trigger it manually via the trigger dag UI button either.
We can trigger it via Airflow's API, with a simple call like this:
import requests:

AIRFLOW_API_ENDPOINT = "http://.....//api/experimental"
DAG_ID = "navigator_pdt_supplier" # dag to trigger

# these are the custom parameters
parameters = {"customer_code": "ACME"}

result = requests.post(f"{AIRFLOW_API_ENDPOINT}/dags/{DAG_ID}/dag_runs", json={"conf": parameters})
This is great, but not only requires an additional security step (opening Airflow API), but it restricts Airflow usage only to technical people who know how to do api calls.
Here comes Jenkins' killer feature! which is, you can define parameters using a simple interface when triggering a Job!
This is a feature that is not available on Airflow. Which brings us to the meat of this post:
How to add a "custom trigger" option on Airflow:
Airflow's interface and functionality can be expanded by the use of plugins. We can update or create Operators easily, and we can also create web views to add additional features.
Plugins need to be saved on the Airflow plugins folder, usually $AIRFLOW_HOME/plugins
Airflow UI can be run using 2 different Flask-based packages. By default it uses Flask-Admin to render the UI, however if the new Role Based Access Control flag is enabled RBAC, Airflow uses Flask-appbuilder to manage the UI.
We can create a plugin called trigger_view.py and save it in the Airflow plugins directory with the following contents:
from airflow.api.common.experimental.trigger_dag import trigger_dag
from airflow import configuration as conf
from airflow.plugins_manager import AirflowPlugin
from airflow.models import DagBag
from flask import render_template_string, request, Markup
from airflow.utils import timezone


trigger_template = """
<head></head>
<body>
    <a href="/home">Home</a>
      {% if messages %}
        <ul class=flashes>
        {% for message in messages %}
          <li>{{ message }}</li>
        {% endfor %}
        </ul>
      {% endif %}
    <h1>Manual Trigger</h1>
    <div class="widget-content">
       <form id="triggerForm" method="post">
          <label for="dag">Select a dag:</label>
          <select name="dag" id="selected_dag">
              <option value=""></option>
              {%- for dag_id, dag_arguments in dag_data.items() %}
              <option value="{{ dag_id }}" {% if dag_id in selected %}selected="selected"{% endif %}>{{ dag_id }}</option>
              {%- endfor %}
          </select>
          <div id="dag_options">
              {%- for dag_id, dag_arguments in dag_data.items() %}
                  <div id="{{ dag_id }}" style='display:none'>
                    {% if dag_arguments %}
                        <b>Arguments to trigger dag {{dag_id}}:</b><br>
                    {% endif %}
                    {% for dag_argument_name, _ in dag_arguments.items() %}
                        <input type="text" id="{{ dag_argument_name }}" name="{{dag_id}}-{{ dag_argument_name }}" placeholder="{{ dag_argument_name }}" ><br>
                    {% endfor %}
                  </div>
              {%- endfor %}
          </div>
          <br>
          <input type="submit" value="Trigger" class="btn btn-secondary">
        {% if csrf_token %}
            <input type="hidden" name="csrf_token" value="{{ csrf_token() }}"/>
        {% endif %}
       </form>
    </div>
</body>
<script type="text/javascript">
var selectedDag = document.getElementById("selected_dag");
var previous;
selectedDag.addEventListener("change", function() {
    if (previous) previous.style.display = "none"
    var dagOptions = document.getElementById(selectedDag.value);
    dagOptions.style.display = "block";
    previous = dagOptions;
});
</script>
"""


def trigger(dag_id, trigger_dag_conf):
    """Function that triggers the dag with the custom conf"""
    execution_date = timezone.utcnow()

    dagrun_job = {
        "dag_id": dag_id,
        "run_id": f"manual__{execution_date.isoformat()}",
        "execution_date": execution_date,
        "replace_microseconds": False,
        "conf": trigger_dag_conf
    }
    r = trigger_dag(**dagrun_job)
    return r


# if we dont have RBAC enabled, we setup a flask admin View
from flask_admin import BaseView, expose
class FlaskAdminTriggerView(BaseView):
    @expose("/", methods=["GET", "POST"])
    def list(self):
        if request.method == "POST":
            print(request.form)
            trigger_dag_id = request.form["dag"]
            trigger_dag_conf = {k.replace(trigger_dag_id, "").lstrip("-"): v for k, v in request.form.items() if k.startswith(trigger_dag_id)}
            dag_run = trigger(trigger_dag_id, trigger_dag_conf)
            messages = [f"Dag {trigger_dag_id} triggered with configuration: {trigger_dag_conf}"]
            dag_run_url = DAG_RUN_URL_TMPL.format(dag_id=dag_run.dag_id, run_id=dag_run.run_id)
            messages.append(Markup(f'<a href="{dag_run_url}" target="_blank">Dag Run url</a>'))
            dag_data = {dag.dag_id: getattr(dag, "trigger_arguments", {}) for dag in DagBag().dags.values()}
            return render_template_string(trigger_template, dag_data=dag_data, messages=messages)
        else:
            dag_data = {dag.dag_id: getattr(dag, "trigger_arguments", {}) for dag in DagBag().dags.values()}
            return render_template_string(trigger_template, dag_data=dag_data)
v = FlaskAdminTriggerView(category="Extra", name="Manual Trigger")


# If we have RBAC, airflow uses flask-appbuilder, if not it uses flask-admin
from flask_appbuilder import BaseView as AppBuilderBaseView, expose
class AppBuilderTriggerView(AppBuilderBaseView):
    @expose("/", methods=["GET", "POST"])
    def list(self):
        if request.method == "POST":
            print(request.form)
            trigger_dag_id = request.form["dag"]
            trigger_dag_conf = {k.replace(trigger_dag_id, "").lstrip("-"): v for k, v in request.form.items() if k.startswith(trigger_dag_id)}
            dag_run = trigger(trigger_dag_id, trigger_dag_conf)
            messages = [f"Dag {trigger_dag_id} triggered with configuration: {trigger_dag_conf}"]
            dag_run_url = DAG_RUN_URL_TMPL.format(dag_id=dag_run.dag_id, run_id=dag_run.run_id)
            messages.append(Markup(f'<a href="{dag_run_url}" target="_blank">Dag Run url</a>'))
            dag_data = {dag.dag_id: getattr(dag, "trigger_arguments", {}) for dag in DagBag().dags.values()}
            return render_template_string(trigger_template, dag_data=dag_data, messages=messages)
        else:
            dag_data = {dag.dag_id: getattr(dag, "trigger_arguments", {}) for dag in DagBag().dags.values()}
            return render_template_string(trigger_template, dag_data=dag_data)


v_appbuilder_view = AppBuilderTriggerView()
v_appbuilder_package = {"name": "Manual Trigger",
                        "category": "Extra",
                        "view": v_appbuilder_view}


# Defining the plugin class
class TriggerViewPlugin(AirflowPlugin):
    name = "triggerview_plugin"
    admin_views = [v] # if we dont have RBAC we use this view and can comment the next line
    appbuilder_views = [v_appbuilder_package] # if we use RBAC we use this view and can comment the previous line
After setting up the plugin and restarting the airflow UI, we get an additional menu link on the top bar, clicking on it will lead us to this glorious interface:
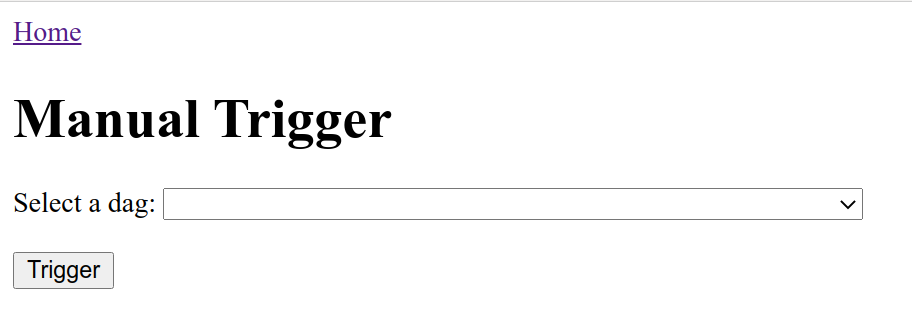
On this new menu we will be able to manually trigger a dag, and if that dag has an additional parameter trigger_arguments , the trigger menu will allow us to trigger the dag with the custom parameter!
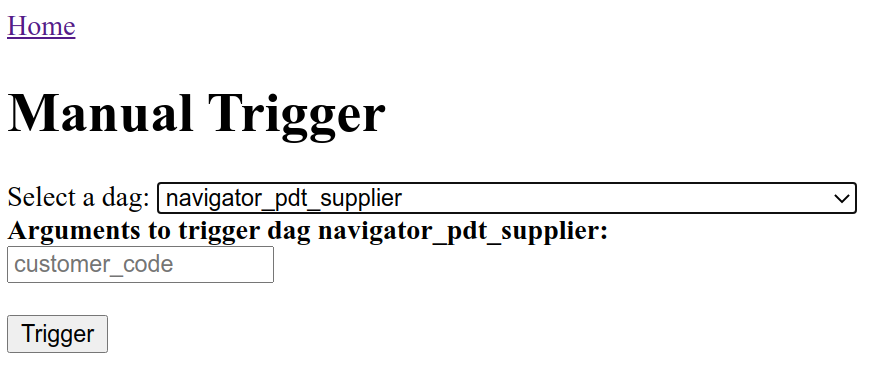
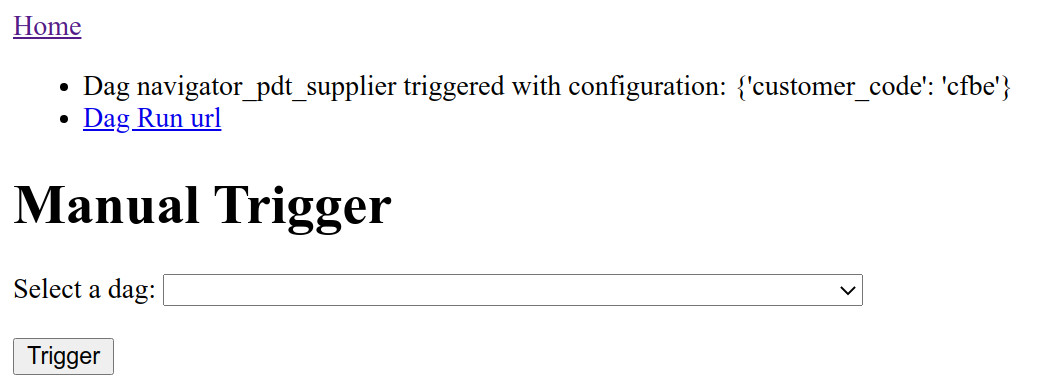
After we select the customer_code parameter and click the trigger button, we get a confirmation message and a link to the specific dag run so we can monitor it.
Neat right? There are many ways to improve this simple plugin (adding an execution_date datepicker, or different UI forms depending on the argument type), would love to hear how you would update them!